Showing posts with label DIY. Show all posts

Monday, November 25, 2013

Guest Room Reveal


Hey Ya'll!

Happy Turkey Week! So, I have been MIA for about the last week, whoops. But, I have a reason I promise, I have finished the guest room! With the exception of a few knick-knacks it's basically finished. Since I gave myself a time crunch to finish the room, I still wanted to be as frugal as possible. I went to the Antique stores, bought clearance items and gave items a fresh coat of paint to match the room. Paint really gives a new out look to out dated pieces.

Through out the next few posts I will be sharing how and where I came up with the DIY pieces in the guest room. But, for now I want to show you the whole room and how we made the head board. After, searching Craigslist and making my rounds to the antique stores, I stumbled across the perfect fireplace mantle. The captain and I went the following weekend and picked up the mantle.


I started with giving the room a new coat of paint to warm it up. I had an idea on what color I wanted, but needed a little push. With Valspar being my go to brand of paint, I jumped on Pinterest and searched Valspar paint colors. Scrolling through I came upon a perfect mix of grey and brown, Magic Spell. When I went into Lowes to look at the paint chip card for the color I couldn't find it, so I asked the paint mixer guy.....lol what is their real title? Anyways, he informed me that it was an older color and they didn't have the card anymore. Even though they didn't have the card it was still in the system and he could mix me up a sample. So, I grabbed 3 samples of Magic Spell, Hopsac, and a color with more brown undertones. I was definitely sold on Magic spell after painting a small section next to the others. Just check out the difference between the colors and the big change after the new paint!


Hopsac is at the top with the brown being in the middle and Magic Spell on the bottom of the paint sampling. Hopsac is a great color and I'm looking at using it in the guest bathroom soon. It's just a little bit darker than the builder-grade paint and will hold up more than the builders paint. Below you can really see the difference in the room.
 
 
I started painting the room a few days before we got the fireplace mantle so I wouldn't be distracted and could finish painting within a couple days. When I purchased the paint for the room I also grabbed paint for the mantle and accent pieces. I chose Antique White, also by Valspar.
 
DIY Fireplace Mantle Headboard
 
Fireplace Mantle Before:

 
The Mantle started out pretty rough with a few old coats of paint and it was chipping pretty bad. The place we got it from had it nailed into the wall with massive nails and left holes. Nothing a little wood filler wouldn't fix!
 
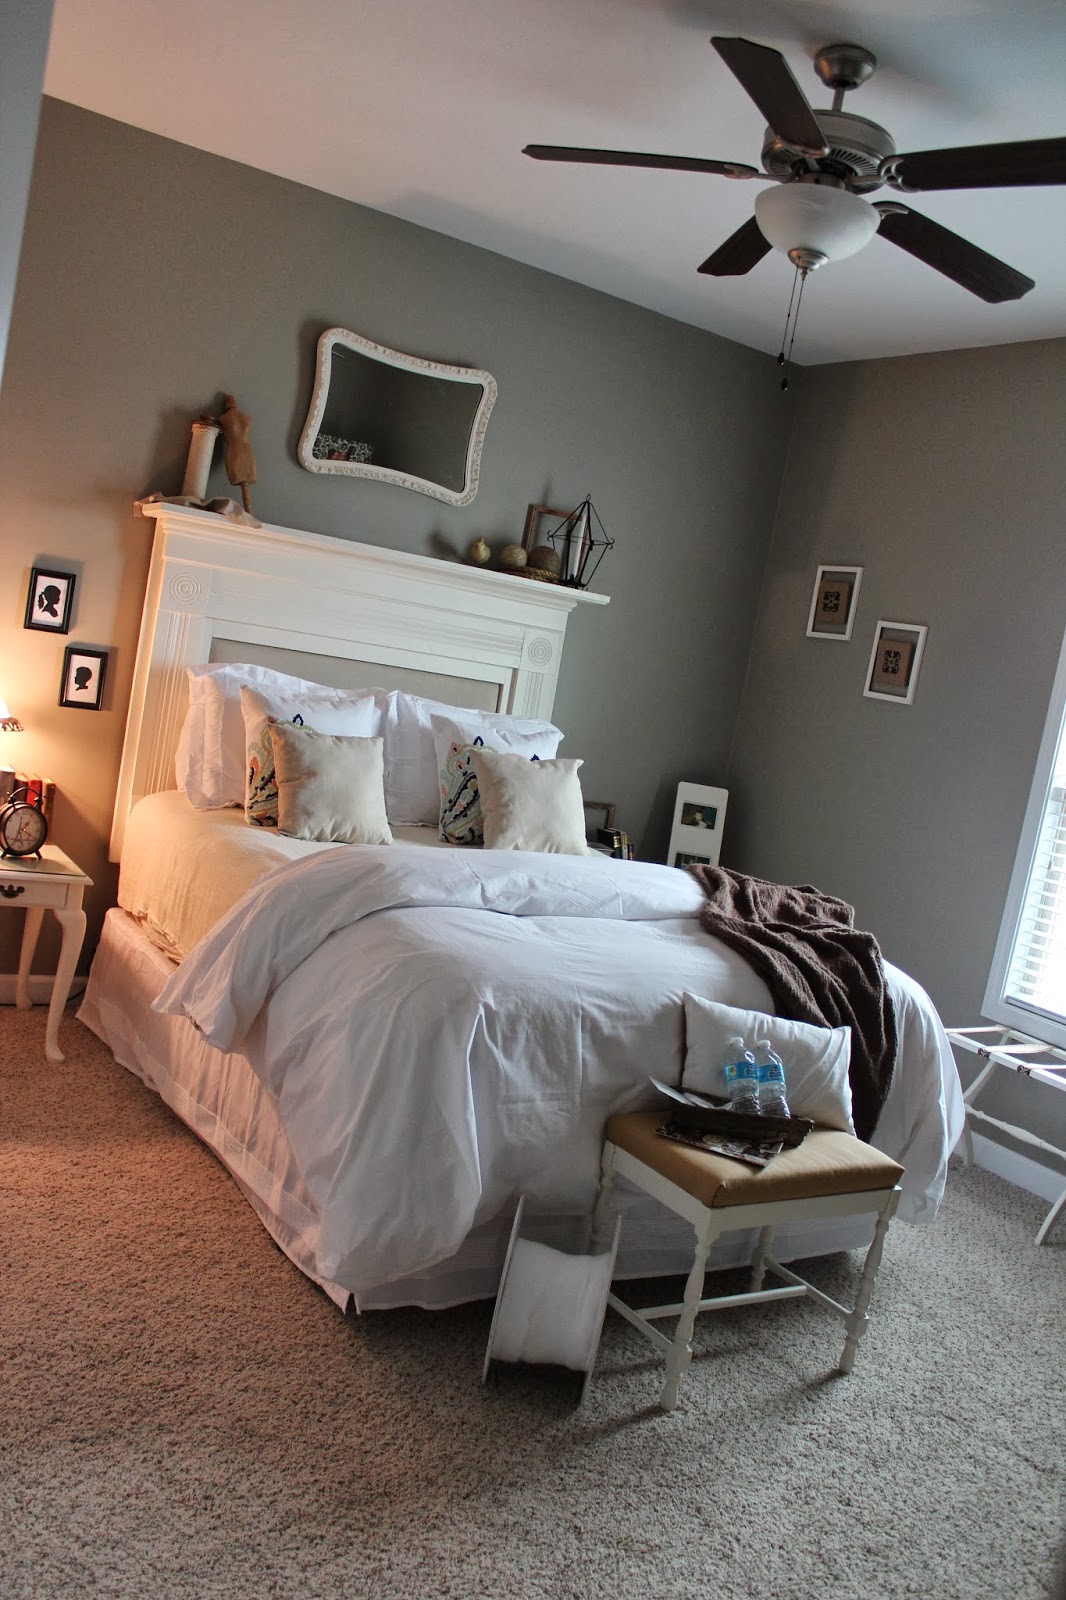
Before I started giving the mantle a facelift, we needed to measure the height and the plywood for the tufted inlay. We measured the height of our master bedroom headboard here, we used it as a guide height for the mantle. Our headboard is 65" tall and I wanted the mantle to be at least that tall. Bryan started out with 2 - 2x4's and screwed them to the legs to make the top of the mantle stand at 65" tall. We then carried the mantle in to check the height of it behind the bed and it ended up working out perfectly.
 
 
After attaching the legs at the correct height, Bryan measured out the plywood. We made the plywood overlap behind the opening on the back by 4 inches. This would gives us enough room to be able to screw the plywood to the back after it was tufted. Here in the picture you can see that we didn't go all the way to the bottom of the mantle with the plywood, but it went far enough behind the mattress that you couldn't tell and it saved on fabric. :) Next, we measured and drilled for the button holes.


Here's a diagram on the measurements between the buttons:


Bryan's job was finished for now. It was my turn now to beautify the mantle. I started out with filling the holes with wood filler and letting it set for 30 minutes. Once it was done setting I began sanding the mantle to strip away the old paint the was chipping off and sanding down the wood filler. When I was sanding, I left some rough spots and a couple holes to leave some character.


Next, it was time for two coats of paint, in Antique White!
 
Fabulous!
 
While the mantle was drying it was time to make the tufted inlay to attach in the middle. I began with covering the buttons. I purchased the aluminum buttons from my local craft store. On the back of the box is a pattern that I traced and cut out as a guide for the size. I traced out 8 circles for the buttons and cut those out of the same fabric as the headboard fabric. I took the rounded button piece and wrapped the fabric circle around it with a dot of hot glue in the center. I then pushed in the flat piece with the metal button loop on the outside. ( I used a screw driver to push it in to the rounded button piece)
 
 
After the buttons were finished, I started on the plywood piece. When we measured out the plywood we traced the opening in the middle of the mantle to mark where the foam needed to go. The measurements were 4" all the way around from the edge of the plywood, with the exception of the bottom. I used 1" foam for this headboard and glued it to the plywood with hot glue. After attaching the foam I stapled the batting just around the edges of the foam. Leaving the rest of the batting to be stapled with the fabric after the tufting.
 
 
Next, it was time for the tufting. I began by threading the buttons with upholstery thread. I first made a loop and stuck that through the loop on the buttons. Taking the opposite ends I put those through the loop making a knot. See picture below to see how I did this...I repeated this process at least 3 times.
 
 
Before tufting the fabric, I stapled the top edge of the batting and the fabric to the back of the headboard to help keep it in place. I always ask Bryan for assistance on this part so we can work from both sides. We use a long upholstery needle for the process. Bryan sticks the needle through the back hole to the front side and I thread the ends of the button strings through needle. He then pulls the needle back to his side, pulling the ends of the button thread to his side to staple. As he's pulling on the thread tight, I push on the button to make sure it's pulled as tight as possible. (To see his stapling technique click here
 
 
After all the buttons are in, I finished it up by pulling and smoothing out the fabric and stapling it on the backside of the plywood. Eeeek, almost done!
 
Check out the baby feet!
 
Last step, we attached the plywood piece to the mantle by screwing it to the back. Queue in Bryan and the screw gun! When we attached the 2x4 legs they were right against the plywood. With the plywood now covered in batting and fabric it was a snug fit, but with a little elbow grease we fit it right in place.


Here is a photo of what the whole headboard looks like with the legs:
 
Here it is behind the bed before décor and new bedding:
 
With a little DIY and paint it's amazing the transformations you will get. Every time I walk by the guest room it makes me smile. I kind of want to use it as my reading room! It feels cozy and I want to curl up in the bed myself. Here is a little before and after picture...
 
 
There are just a few finishing touches, but for now I am really happy with the room. I hope you find the instructions helpful and if you have any questions about anything in the room or the headboard feel free to ask!
Stay tuned for more DIYs that I did in this room!
 
Until next time,
Ciao!


Follow my blog with Bloglovin

Sunday, November 10, 2013

Project Stool

Hey Ya'll!
 
In my last post I shared new décor pieces for the guest room. Today, I'm going to share the love I gave to the Project Stool, who needed a lot of it!  The Stool was a little wobbly with the tiniest bit of padding for a seat and a weird paint job that resembled wood of some sort. I couldn't wait to get started on her, so I went the next day to pick up a few supplies I didn't have at the house already.  It didn't take a lot of time at all. Watch me give her new life.....
 
Her Before Life...
 
Here you can see the odd paint job...
 
and the wonderful choice of fabric.
 
Not only did she have one upholster job, but 2...Vinyl! Why Vinyl? We may never know.
 
 
Process of her new life...
 
First I wanted to replace the seat with new fabric and cushion. I started off unscrewing the seat from the stand and removed the old fabric of choice. hehe, just wait....
Here is the Vinyl in all it's glory of a marbled blue!


I took off the first layer and then the Vinyl. Then to my surprise....there was more! This lovely but very grotesque green fabric. I can tell this fabric lived on the stool for quite some time. You can see in the discoloration that it has been a while since its first upholstery job. I wanted gloves at this point, I might need to invest in some :)


After removing the 3 layers of fabric and the tiniest of padding, the wood was in great condition still. I gathered all my supplies for the seat and measured out the foam padding. I laid the wood on top of the foam and outlined with a sharpie. I cut the foam with a serrated knife and hot glued it to the wood. Here it's shown with 1" foam, I ended up layering up and making it 2", because I wanted it thicker. I just glued the second layer to the bottom one.
* I used a low heat glue gun so it wouldn't melt the foam. 
 
 
Next, I took the fabric and batting to measure for the seat. I laid the fabric down with the wood on top and measured 5" out from the wood all the way around. Then I did the same with the batting. ( I eyed the batting, so it's not perfect)
*For the fabric I chose a desert sand color in linen.


I laid the fabric down first and then the batting.


Next, after laying the wood and foam (foam-side facing down) down in the middle, I started pulling up the sides and stapling. Continuing all the way around till all sides are secure.


When the seat was complete, I started on the base. First, I sanded down any chipped paint, wood or uneven spots I didn't like. I then went around hammering in any nails making their way out and hammering the pegs back in place. This helped with the sturdiness of the stool. I wiped her down and started painting. I choose antique white by Valspar. It's the perfect "off white" for accent pieces in the guest room. I'm loving the Valspar "paint and primer in one" for my small projects, because its saving me a little time from having to paint the first layer of primer.
* Now for projects with a painted surface, I will use a primer for a little extra smoothness for the first coat.
 
 
After giving it a second coat of paint, (not pictured) I let it dry for about 20 minutes and attached the seat. She is now showing off her new beauty in the guest room waiting for her new bed set to pair up with! I'm thinking of tufting the seat, but first I want to see how the stool fits in when the room is complete. Then I will make my decision!


What are your thoughts? The colors are natural and bright but I believe they will still feel very cozy when it's all pulled together. Check out the before and after transformation below! 


It still amazes me how much a little paint, fabric and TLC will transform a piece!
 
Until next time,
Ciao!
 

Tuesday, October 29, 2013

DIY Upholstered Headboard

Our lovely finished headboard
 
 
Ever since we moved into the new house, I have been searching for the perfect headboard. I have filed through online stores, bargain stores (TJ maxx, Ross) and even high end stores, just to dream a little. Scrolling through Restoration Hardware, I fell in love with this Gem! I knew Bryan would never agree to pay that amount for a bed, $1700 is a little steep for our price range :)
 
So, on to plan B, I started researching ways to make my own. On top of researching, I Googled tutorials about "how to" do it. It was coming off a lot easier than I thought it was going to be, I was definitely sold on the idea! Scrolling, and scrolling, and some more scrolling through Pinterest, I came across this beautiful Headboard. Sarah's design for her tufted-wingback headboard was perfect! A lot of my inspiration came from Sarah M. Dorsey and Restoration Hardware.

 In my vision, I wanted our headboard to be a little taller than some of the normal sized headboards. I also wanted it to be a little wider for my massive amount of pillows I'm "collecting". We left the measurements just wide enough for the frame to fit in between the arms of the headboard and wide enough for the 3 large white pillows :) With A LOT of help from the husband, here is how we made our headboard...
 
Supplies- For a Queen Size
 
1- 63" x 48" (1/2" plywood)
2- 1 x 4's
2- 1 x 6's
2- 2 x 6's 
Box of 4" screws
5 yards of fabric                    
Batting to cover the main piece and arms
28- 7/8" Aluminum Cover Buttons 
1" Foam to cover the plywood (took 2 of these)
Long Upholstering needle
Upholstering Thread
Spray Adhesive
Staple Gun and Staples
 
Plans for the Headboard:
Inspiration also from Sarah, my measurements are just a little different
 
Measurements for the entire headboard.                      


Braces for the backside 1/4's
 
 
Fabric Measurements
 
Button Hole Measurements
 
 
First Bryan cut the plywood to size 63" x 48"

 Then we cut the 1/4's to size, to frame the backside of the plywood


After framing out the plywood we screwed them into place


Colt decided to help Daddy measure out the holes to drill for the buttons
*Measurements above

Marks for the holes


Colt helping Daddy drill the holes
 
Bryan (and Colt) went ahead and put the arms together. Taking a 1 x 6 and a 2 x 6, he sandwiched them together with screws. *we will cover and attach these later
 
Now my turn, here I already attached the foam to the plywood. I laid it right side down on top of the fabric and batting.*Serrated knives are great for cutting foam :)
 

I then made my way around and stapled the batting and fabric to the plywood.
 

I cut out the template on the back of the button packaging and traced the 28 circles for the buttons. Some of the buttons needed a little glue, since these aren't heavy duty buttons.
 
While Bryan took a little break and watched TV, I threaded the buttons and threaded them though the holes. I didn't get a picture of how I threaded the buttons and I apologize :(. But I did double up the thread to make it stronger. When I started the Tufting, I started in the middle and enlisted Bryan's help again. As I pushed on the buttons from my side, Bryan pulled and stapled from the back side.     *(arrows) Don't forget to push those stray threads behind the buttons, don't cut them.
 

Here's a look at how he stapled the thread, doubling back a couple times.


Next, we took the fabric for the arms and laid it right side down, stapling it on the underside of the plywood. Then we brought in the arms (The 1 x 6 and 2 x 6) for each side. Bryan then screwed them into the side of the headboard, screwing into the 1 x 4's that braced the back. His job is now done :) Once the arms are attached it was my turn to finish covering the arms. Eeeek, almost done! It took me several tries to get the folds just the way I wanted, but it all worked.


Here's a look at how I folded the edges to make a smooth continuous front on the arms. I admit, it was a little tough for me. Practice makes perfect!
 
She's complete! *At the arrow you can seethe fabric folded over from the arm. We also had a little bit of fabric left over, but incorporated it into my mantle design. (coming soon)
 
A look at how it fits around the frame and mattress.
 
Here she is!!!

Bryan just had one more job and that was to help me put this baby into place! I was so excited to sleep in our bed that night and wake up to our beautiful headboard. Now all I need, is to finish my pillow collection and find the perfect white duvet. We hope ya'll enjoy our project, as much as we did. If you have any questions, just ask :) We would love to chat!
 
New Pillows!
New pillows from TJ maxx :)
 
Until next time...
Ciao!